Quick Start: Webots Simulator

Launch a full autonomous navigation stack in under 5 minutes.

In this tutorial, we use a single Python script, a “Recipe”, to build a complete point-to-point navigation system. We’ll use the Webots simulator and a Turtlebot3 to demonstrate how Kompass components link together.


1. Prepare the Environment

To make things easy, we created kompass_sim, a package with ready-to-launch simulation environments.

  1. Build the Simulation: Clone and build the simulator support package in your ROS2 workspace:

    git clone https://github.com/automatika-robotics/kompass-sim.git
    cd .. && rosdep install --from-paths src --ignore-src -r -y
    colcon build --packages-select kompass_sim
    source install/setup.bash
    
  2. Launch Webots: Start the Turtlebot3 simulation world. This will bring up Webots, RViz, and the robot localization nodes:

    ros2 launch kompass_sim webots_turtlebot3.launch.py
    
Webots Simulation: Turtlebot3 in a house environment

Webots Simulation: Turtlebot3 in a house environment


2. The Navigation Recipe

The power of Kompass lies in its Python API. Instead of complex XML/YAML launch files, you define your navigation logic in a clean script.

Create a file named quick_start.py and paste the following code:

import numpy as np
import os
from ament_index_python.packages import (
    get_package_share_directory,
)

# IMPORT ROBOT CONFIG PRIMITIVES
from kompass.robot import (
    AngularCtrlLimits,
    LinearCtrlLimits,
    RobotGeometry,
    RobotType,
    RobotConfig,
    RobotFrames,
)

# IMPORT KOMPASS COMPONENTS
from kompass.components import (
    Controller,
    DriveManager,
    DriveManagerConfig,
    Planner,
    PlannerConfig,
    LocalMapper,
    LocalMapperConfig,
    MapServer,
    MapServerConfig,
    TopicsKeys,
)

# IMPORT KOMPASS ALGORITHMS CONFIG PRIVITIES
from kompass.control import ControllersID, MapConfig

# IMPORT KOMPASS ROS PRIVITIES
from kompass.ros import Topic, Launcher, Event, Action, actions


kompass_sim_dir = get_package_share_directory(package_name="kompass_sim")

# Setup your robot configuration
my_robot = RobotConfig(
    model_type=RobotType.DIFFERENTIAL_DRIVE,
    geometry_type=RobotGeometry.Type.CYLINDER,
    geometry_params=np.array([0.1, 0.3]),
    ctrl_vx_limits=LinearCtrlLimits(max_vel=0.4, max_acc=1.5, max_decel=2.5),
    ctrl_omega_limits=AngularCtrlLimits(
        max_vel=0.4, max_acc=2.0, max_decel=2.0, max_steer=np.pi / 3
    ),
)

# Configure the Global Planner
planner_config = PlannerConfig(loop_rate=1.0)
planner = Planner(component_name="planner", config=planner_config)
planner.run_type = "Timed"

# Configure the motion controller
controller = Controller(component_name="controller")
controller.algorithm = ControllersID.PURE_PURSUIT
controller.direct_sensor = (
    False  # Get local perception from a "map" instead (from the local mapper)
)

# Configure the Drive Manager (Direct commands sending to robot)
driver_config = DriveManagerConfig(
    critical_zone_distance=0.05,
    critical_zone_angle=90.0,
    slowdown_zone_distance=0.3,
)
driver = DriveManager(component_name="drive_manager", config=driver_config)
# Publish Twist or TwistStamped from the DriveManager based on the distribution
if "ROS_DISTRO" in os.environ and (
    os.environ["ROS_DISTRO"] in ["rolling", "jazzy", "kilted"]
):
    cmd_msg_type: str = "TwistStamped"
else:
    cmd_msg_type = "Twist"

driver.outputs(robot_command=Topic(name="/cmd_vel", msg_type=cmd_msg_type))

# Configure a Local Mapper
local_mapper_config = LocalMapperConfig(
    map_params=MapConfig(width=3.0, height=3.0, resolution=0.05)
)
local_mapper = LocalMapper(component_name="mapper", config=local_mapper_config)

# Configure the global Map Server
map_file = os.path.join(kompass_sim_dir, "maps", "turtlebot3_webots.yaml")
map_server_config = MapServerConfig(
    loop_rate=1.0,
    map_file_path=map_file,  # Path to a 2D map yaml file or a point cloud file
    grid_resolution=0.5,
    pc_publish_row=False,
)
map_server = MapServer(component_name="global_map_server", config=map_server_config)

# Setup the launcher
launcher = Launcher()

# Add Kompass components
launcher.kompass(
    components=[map_server, controller, planner, driver, local_mapper],
    multiprocessing=True,
)

# Get odom from localizer filtered odom for all components
odom_topic = Topic(name="/odometry/filtered", msg_type="Odometry")
launcher.inputs(location=odom_topic)

# Set the robot config for all components
launcher.robot = my_robot
launcher.frames = RobotFrames(world="map", odom="map", scan="LDS-01")

# Enable the UI
# Outputs: Static Map, Global Plan, Robot Odometry
launcher.enable_ui(
    outputs=[
        map_server.get_out_topic(TopicsKeys.GLOBAL_MAP),
        odom_topic,
        planner.get_out_topic(TopicsKeys.GLOBAL_PLAN),
    ],
)

# Run the Recipe
launcher.bringup()


3. Run and Navigate

Open a new terminal and run your recipe:

python3 quick_start.py

You will see the components starting up in the terminal. Once ready, you have two ways to control the robot.

Option A: The Kompass Web UI

The recipe includes launcher.enable_ui(...), which automatically spins up a lightweight web interface for monitoring and control.

  1. Check Terminal: Look for a log message indicating the UI URL: http://0.0.0.0:5001.

  2. Open Browser: Navigate to that URL.

  3. Send Goal: You will see the map and the robot’s live position. Simply click the publish point button and Click anywhere on the map to trigger the Planner and send the robot to that location.

UI Navigation View

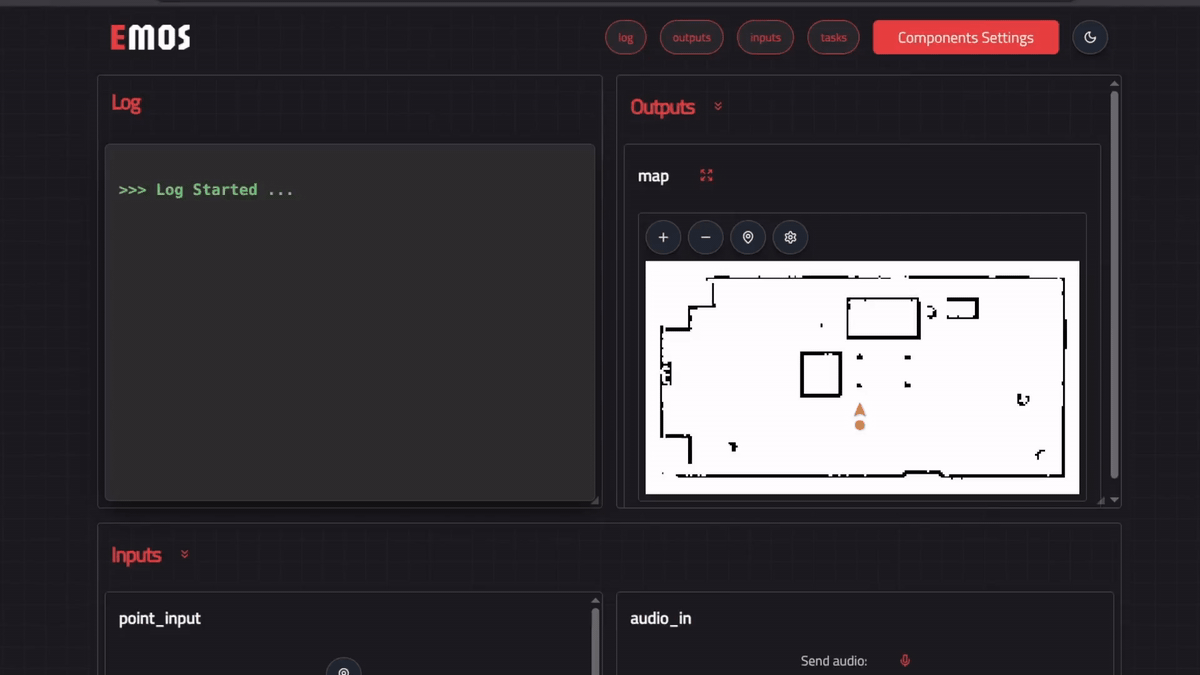
Kompass UI View: Point Navigation Recipe

Option B: RViz

If you prefer the standard ROS tools:

  1. Go to the RViz window launched in Step 1.

  2. Select the Publish Point tool (sometimes called Clicked Point) from the top toolbar.

  3. Click anywhere on the map grid.

  4. The robot will plan a path (Blue Line) and immediately start driving.

RViz Navigation View

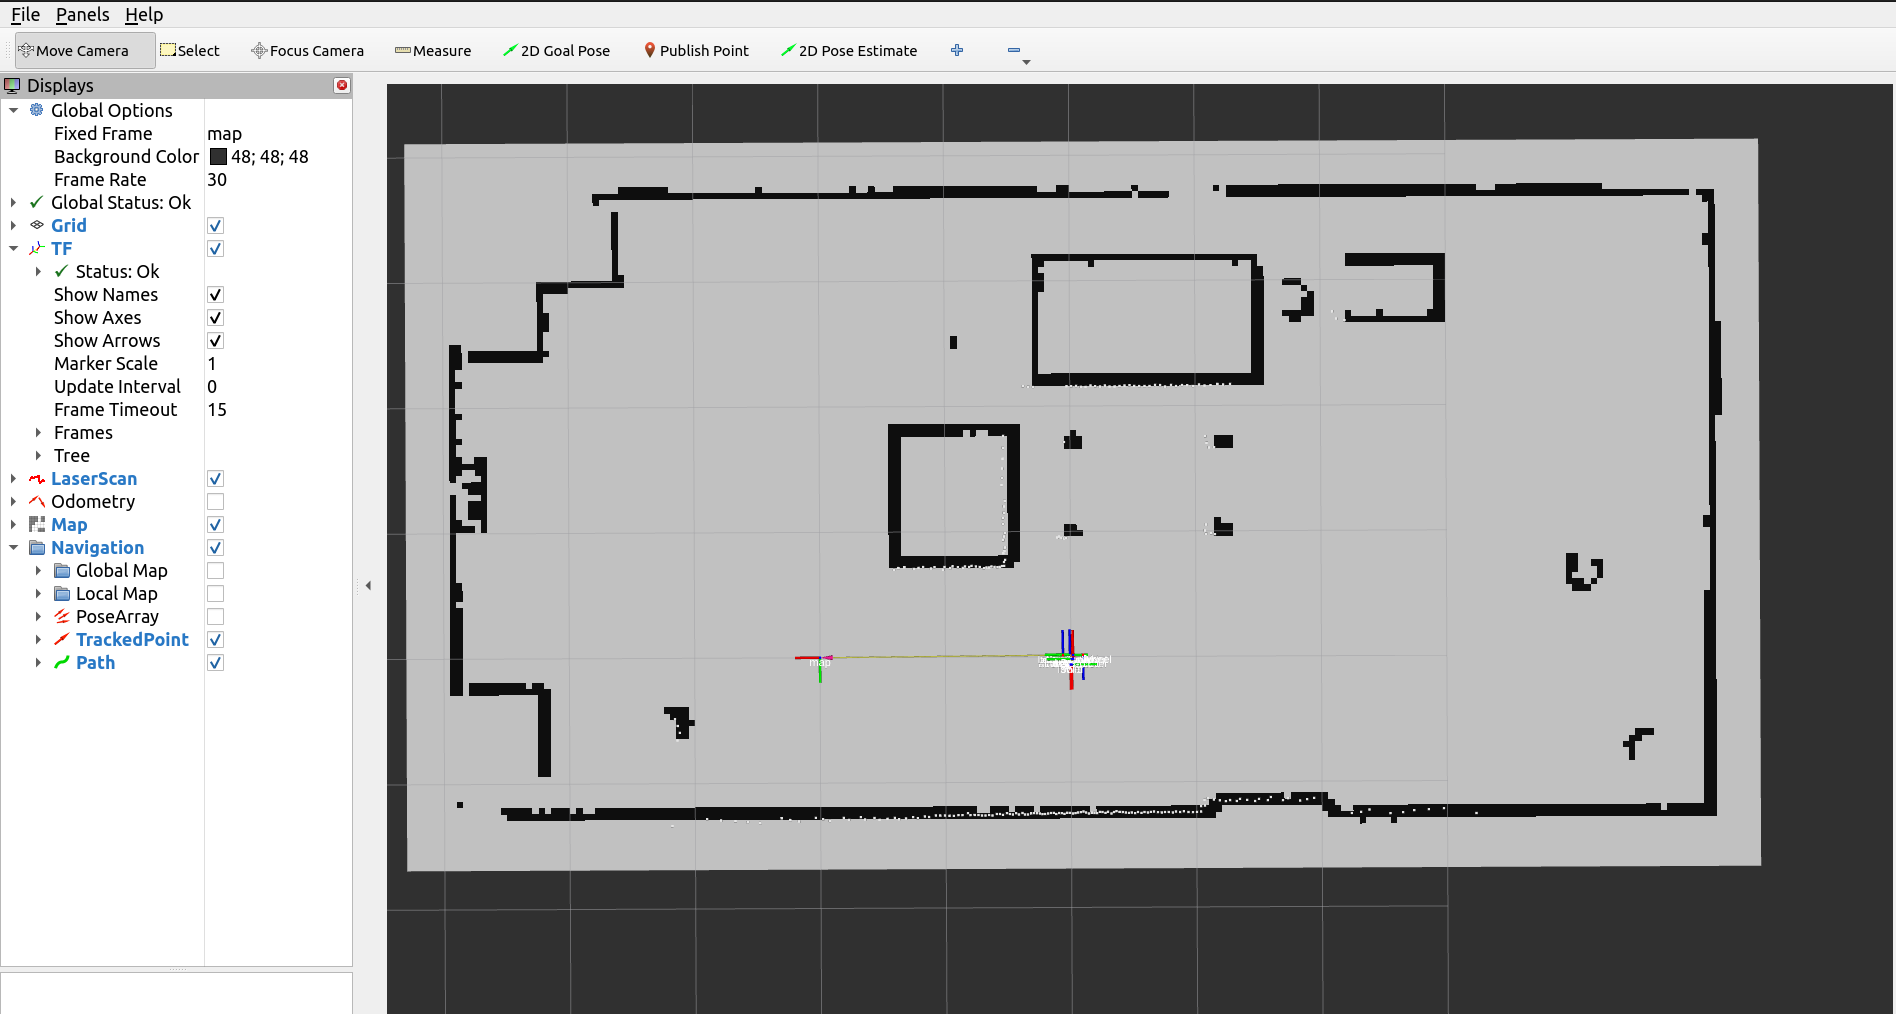
RViz View: Blue line shows the global path, red arrow shows the local command.


What just happened?

  • Components: You configured your robot and the navigation components directly directly in your python recipe.

  • Launcher: Automatically managed the lifecycle of 5 ROS2 nodes in multi-processing.

  • Web UI: Visualized the map, plan, and odometry topics instantly without installing extra frontend tools.

Tip

Check the Point Navigation Guide for a deep dive into this recipe.